Navigation and Data Transfer Between Pages in Flutter
Last updated:
7 min read

One of the first things people coming from web development ask in Flutter is: "If there are no links, how do you move between pages?" The answer is Navigator.
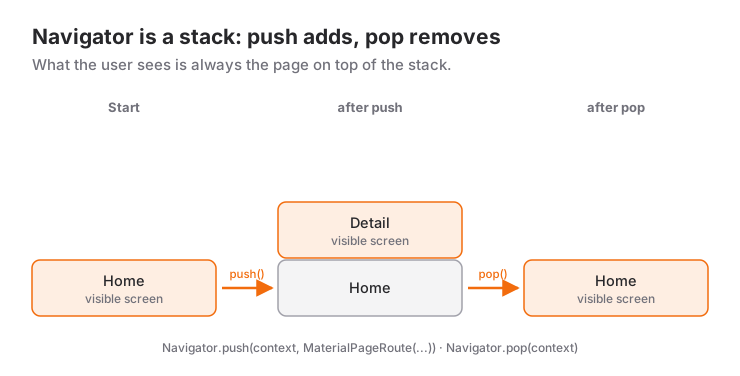
In Flutter, the Navigator class is used for page navigation. It works like a stack data structure: You open a page, it's added to the top; you press back, the top page is removed. If the widget tree, Scaffold and BuildContext are still fuzzy, start with the widget tree and layout post — everything here builds on those.
Live Demo: Using Navigator
Try page navigation and data transfer interactively:
💡 If the example above doesn't load, click DartPad to run it in a new tab.
Basic Navigator Usage
The simplest way to navigate from one page to another:
// Home page
class HomePage extends StatelessWidget {
  const HomePage({super.key});

  @override
  Widget build(BuildContext context) {
    return Scaffold(
      appBar: AppBar(title: Text('Home Page')),
      body: Center(
        child: ElevatedButton(
          child: Text('Go to Detail Page'),
          onPressed: () {
            Navigator.push(
              context,
              MaterialPageRoute(builder: (context) => const DetailPage()),
            );
          },
        ),
      ),
    );
  }
}

// Detail page
class DetailPage extends StatelessWidget {
  const DetailPage({super.key});

  @override
  Widget build(BuildContext context) {
    return Scaffold(
      appBar: AppBar(title: Text('Detail Page')),
      body: Center(
        child: Text('This is the detail page'),
      ),
    );
  }
}
Navigator.push() opens a new page. MaterialPageRoute provides the page transition animation.
Going Back - pop()
There are two ways to go back:
1. Automatic Back Button
If you use AppBar, Flutter automatically adds a back button. The user clicks it to go back.
2. Programmatic Back Navigation
ElevatedButton(
  child: Text('Go Back'),
  onPressed: () {
    Navigator.pop(context);
  },
)
Navigator.pop() removes the top page from the stack.
Sending Data Between Pages
This is where it gets interesting. We use constructors to send data to pages.
Page Sending Data
class ProductListPage extends StatelessWidget {
  const ProductListPage({super.key});

  @override
  Widget build(BuildContext context) {
    return Scaffold(
      appBar: AppBar(title: Text('Products')),
      body: ListView(
        children: [
          ListTile(
            title: Text('iPhone 15'),
            subtitle: Text('\$999'),
            onTap: () {
              Navigator.push(
                context,
                MaterialPageRoute(
                  builder: (context) => ProductDetailPage(
                    productName: 'iPhone 15',
                    price: 999,
                    description: 'Next generation smartphone',
                  ),
                ),
              );
            },
          ),
          ListTile(
            title: Text('Samsung S24'),
            subtitle: Text('\$899'),
            onTap: () {
              Navigator.push(
                context,
                MaterialPageRoute(
                  builder: (context) => ProductDetailPage(
                    productName: 'Samsung S24',
                    price: 899,
                    description: 'The best of Android',
                  ),
                ),
              );
            },
          ),
        ],
      ),
    );
  }
}
Page Receiving Data
class ProductDetailPage extends StatelessWidget {
  final String productName;
  final int price;
  final String description;

  const ProductDetailPage({
    super.key,
    required this.productName,
    required this.price,
    required this.description,
  });

  @override
  Widget build(BuildContext context) {
    return Scaffold(
      appBar: AppBar(title: Text(productName)),
      body: Padding(
        padding: EdgeInsets.all(16),
        child: Column(
          crossAxisAlignment: CrossAxisAlignment.start,
          children: [
            Text(
              productName,
              style: TextStyle(fontSize: 24, fontWeight: FontWeight.bold),
            ),
            SizedBox(height: 8),
            Text(
              '\$${price.toString()}',
              style: TextStyle(fontSize: 20, color: Colors.green),
            ),
            SizedBox(height: 16),
            Text(
              description,
              style: TextStyle(fontSize: 16),
            ),
          ],
        ),
      ),
    );
  }
}
We use required in the constructor to make parameters mandatory. This way, when opening the page, this information must be provided.
Returning Data When Going Back
Sometimes you want to receive data from the page you opened. For example, the user selected something and you want to send this selection to the previous page.
Page Requesting Data
class SelectCityPage extends StatelessWidget {
  const SelectCityPage({super.key});

  @override
  Widget build(BuildContext context) {
    return Scaffold(
      appBar: AppBar(title: Text('Select City')),
      body: Center(
        child: ElevatedButton(
          child: Text('Choose City'),
          onPressed: () async {
            // Open page and wait for result
            final selectedCity = await Navigator.push<String>(
              context,
              MaterialPageRoute(builder: (context) => const CityListPage()),
            );

            // The page may have closed while we waited; check before using context
            if (!context.mounted) return;

            // Result received
            if (selectedCity != null) {
              ScaffoldMessenger.of(context).showSnackBar(
                SnackBar(content: Text('Selected: $selectedCity')),
              );
            }
          },
        ),
      ),
    );
  }
}
Page Returning Data
class CityListPage extends StatelessWidget {
  const CityListPage({super.key});

  static const List<String> cities = [
    'New York',
    'Los Angeles',
    'Chicago',
    'Houston',
    'Phoenix',
  ];

  @override
  Widget build(BuildContext context) {
    return Scaffold(
      appBar: AppBar(title: Text('City List')),
      body: ListView.builder(
        itemCount: cities.length,
        itemBuilder: (context, index) {
          return ListTile(
            title: Text(cities[index]),
            onTap: () {
              // Send selected city back
              Navigator.pop(context, cities[index]);
            },
          );
        },
      ),
    );
  }
}
With Navigator.pop(context, value), we send data as the second parameter. Writing Navigator.push<String> also declares the type of the returned value; if the user leaves with the back button without choosing, the result is null.
Watch the await line: the user may have left the page while we were waiting for the result. That is why we check context.mounted before using context after the await. Flutter's use_build_context_synchronously lint warns you when that check is missing.
pushReplacement - Preventing Back Navigation
Sometimes you don't want the user to go back to the previous page using the back button. A typical example: Don't return to the login page after logging in.
Normal Navigation with push()
Navigator.push(
  context,
  MaterialPageRoute(builder: (context) => const HomePage()),
);
// User can press back to return to login page
Navigation with pushReplacement()
Navigator.pushReplacement(
  context,
  MaterialPageRoute(builder: (context) => const HomePage()),
);
// Back button goes to the page before login, skipping login
Practical Example: After Login
class LoginPage extends StatelessWidget {
  const LoginPage({super.key});

  void _login(BuildContext context) {
    // Login successful
    Navigator.pushReplacement(
      context,
      MaterialPageRoute(builder: (context) => const HomePage()),
    );
  }

  @override
  Widget build(BuildContext context) {
    return Scaffold(
      body: Center(
        child: ElevatedButton(
          child: Text('Login'),
          onPressed: () => _login(context),
        ),
      ),
    );
  }
}
Now when pressing back on HomePage, it won't return to LoginPage, but will exit the app.
After Registration Example
class RegisterPage extends StatelessWidget {
  const RegisterPage({super.key});

  void _register(BuildContext context) {
    // Registration successful
    Navigator.pushReplacement(
      context,
      MaterialPageRoute(builder: (context) => const LoginPage()),
    );

    ScaffoldMessenger.of(context).showSnackBar(
      SnackBar(content: Text('Registration successful! You can now login.')),
    );
  }

  @override
  Widget build(BuildContext context) {
    return Scaffold(
      appBar: AppBar(title: Text('Register')),
      body: Center(
        child: ElevatedButton(
          child: Text('Complete Registration'),
          onPressed: () => _register(context),
        ),
      ),
    );
  }
}
pushAndRemoveUntil - Clearing the Entire Stack
Sometimes you want to clear not just one page, but the entire stack.
Navigator.pushAndRemoveUntil(
  context,
  MaterialPageRoute(builder: (context) => const HomePage()),
  (route) => false, // Remove all pages
);
This is used to redirect the user to a completely new flow. For example, when logging out, all pages are cleared, only the login screen remains.
Logout Example
void logout(BuildContext context) {
  Navigator.pushAndRemoveUntil(
    context,
    MaterialPageRoute(builder: (context) => const LoginPage()),
    (route) => false,
  );
}
Named Routes
For larger projects, writing MaterialPageRoute every time is tedious. You can use named routes.
Note: Flutter's official documentation does not recommend named routes for most applications. Their deep-link behavior cannot be customized, and on the web the browser's forward button is not supported. If you need those, a routing package such as go_router is the better choice. You will still meet named routes often in existing projects, so it is worth knowing how they work.
Defining Routes in main.dart
void main() {
  runApp(const MyApp());
}

class MyApp extends StatelessWidget {
  const MyApp({super.key});

  @override
  Widget build(BuildContext context) {
    return MaterialApp(
      title: 'Flutter Demo',
      initialRoute: '/',
      routes: {
        '/': (context) => const HomePage(),
        '/detail': (context) => const DetailPage(),
        '/profile': (context) => const ProfilePage(),
        '/settings': (context) => const SettingsPage(),
        '/login': (context) => const LoginPage(),
      },
    );
  }
}
Navigation with Named Routes
// Normal navigation
Navigator.pushNamed(context, '/detail');

// Prevent back navigation
Navigator.pushReplacementNamed(context, '/');

// Clear stack
Navigator.pushNamedAndRemoveUntil(
  context,
  '/login',
  (route) => false,
);
Sending Data with Named Routes
// Sending data
Navigator.pushNamed(
  context,
  '/detail',
  arguments: {
    'id': 123,
    'name': 'John',
  },
);

// Receiving data
class DetailPage extends StatelessWidget {
  const DetailPage({super.key});

  @override
  Widget build(BuildContext context) {
    final args = ModalRoute.of(context)!.settings.arguments as Map;

    return Scaffold(
      appBar: AppBar(title: Text(args['name'])),
      body: Center(
        child: Text('ID: ${args['id']}'),
      ),
    );
  }
}
Navigation with Animation
You can add different transition animations. If you want a shared image to fly from one page into the next instead of the whole page sliding, that is a separate tool: the Hero animation.
Slide from Right (Default)
Navigator.push(
  context,
  MaterialPageRoute(builder: (context) => const DetailPage()),
);
Slide from Bottom
Navigator.push(
  context,
  MaterialPageRoute(
    builder: (context) => const DetailPage(),
    fullscreenDialog: true,
  ),
);
Custom Animation
Navigator.push(
  context,
  PageRouteBuilder(
    pageBuilder: (context, animation, secondaryAnimation) => const DetailPage(),
    transitionsBuilder: (context, animation, secondaryAnimation, child) {
      const begin = Offset(0.0, 1.0);
      const end = Offset.zero;
      const curve = Curves.easeInOut;

      var tween = Tween(begin: begin, end: end).chain(
        CurveTween(curve: curve),
      );

      return SlideTransition(
        position: animation.drive(tween),
        child: child,
      );
    },
  ),
);
Intercepting the Back Button: PopScope
To step in when the user tries to leave a page (for example, to confirm when there are unsaved changes), use PopScope. Android's back button and back gesture, the iOS swipe-back gesture and the back arrow in the AppBar all go through it:
class MyPage extends StatelessWidget {
  const MyPage({super.key});

  Future<bool?> _showExitDialog(BuildContext context) {
    return showDialog<bool>(
      context: context,
      builder: (context) => AlertDialog(
        title: const Text('Are you sure you want to leave?'),
        actions: [
          TextButton(
            child: const Text('No'),
            onPressed: () => Navigator.pop(context, false),
          ),
          TextButton(
            child: const Text('Yes'),
            onPressed: () => Navigator.pop(context, true),
          ),
        ],
      ),
    );
  }

  @override
  Widget build(BuildContext context) {
    return PopScope<Object?>(
      // false: a back gesture does not close the page directly; we are asked first
      canPop: false,
      onPopInvokedWithResult: (bool didPop, Object? result) async {
        // The page is already gone, nothing to do
        if (didPop) return;

        final shouldPop = await _showExitDialog(context) ?? false;
        if (shouldPop && context.mounted) {
          Navigator.pop(context);
        }
      },
      child: Scaffold(
        appBar: AppBar(title: const Text('Page')),
        body: const Center(child: Text('Content')),
      ),
    );
  }
}
How it works:
- While
canPopisfalse, a back gesture does not close the page; insteadonPopInvokedWithResultis called withdidPop: false. - If the user taps "Yes", we close the page ourselves with
Navigator.pop(context). That call triggersonPopInvokedWithResultagain, this time withdidPop: true, which is why theif (didPop) return;line is at the top. - The
context.mountedcheck after theawaitcovers the case where the page was closed for another reason while the dialog was open.
Older tutorials use WillPopScope and onWillPop for this. WillPopScope has been deprecated since Flutter 3.16 because it does not work with Android's predictive back gesture: the system needs to know whether the page can be popped before the user finishes the gesture. PopScope declares that decision ahead of time through canPop, which solves the problem. For the same reason, the onPopInvoked parameter was deprecated in favor of onPopInvokedWithResult.
Practical Tips
1. Call Navigator With a Context Below the Navigator
Navigator.push(context, ...) walks up from the context you give it to find the nearest Navigator. The context in a page's build method is fine for that; every example in this post works that way. The problem appears when the context sits above the Navigator. The most common case is navigating with the context of the widget that creates MaterialApp:
class MyApp extends StatelessWidget {
  const MyApp({super.key});

  @override
  Widget build(BuildContext context) {
    return MaterialApp(
      home: Scaffold(
        body: Center(
          child: ElevatedButton(
            // ❌ This context belongs to MyApp. MaterialApp creates the Navigator,
            // so the Navigator sits below this context.
            onPressed: () => Navigator.push(
              context,
              MaterialPageRoute(builder: (context) => const DetailPage()),
            ),
            child: const Text('Go'),
          ),
        ),
      ),
    );
  }
}
Pressing the button throws "Navigator operation requested with a context that does not include a Navigator". The fix is to move the button into a separate widget that is built below MaterialApp:
class MyApp extends StatelessWidget {
  const MyApp({super.key});

  @override
  Widget build(BuildContext context) {
    return const MaterialApp(home: HomePage());
  }
}

class HomePage extends StatelessWidget {
  const HomePage({super.key});

  @override
  Widget build(BuildContext context) {
    // ✅ This context is below MaterialApp, and therefore below the Navigator
    return Scaffold(
      body: Center(
        child: ElevatedButton(
          onPressed: () => Navigator.push(
            context,
            MaterialPageRoute(builder: (context) => const DetailPage()),
          ),
          child: const Text('Go'),
        ),
      ),
    );
  }
}
If you want to stay in the same build method, wrapping the home: content in a Builder also works, because Builder gives you a new context below MaterialApp. A separate page widget is usually more readable, though. In other words, Builder is not needed for every Navigator.push call, only when the context really is above the Navigator.
2. Using Async/Await
final result = await Navigator.push<String>(
  context,
  MaterialPageRoute(builder: (context) => const SelectPage()),
);

// The page may have closed while we waited
if (!context.mounted) return;

if (result != null) {
  ScaffoldMessenger.of(context).showSnackBar(
    SnackBar(content: Text('Result: $result')),
  );
}
Navigator.push returns a Future that completes when the opened page is popped. Make checking context.mounted after an await a habit before you touch the context again.
3. Avoid Unnecessary Navigator Usage
// ❌ Unnecessary - within the same page
Navigator.push(context, MaterialPageRoute(...));

// ✅ Use state update
setState(() {
  selectedIndex = 1;
});
Every push creates a fresh State object for the page it opens, and every pop disposes it. If you want to know exactly when each of those methods runs, I walk through it step by step in the life cycle post.
Summary
Navigation in Flutter:
- push(): Open new page
- pop(): Go back
- pushReplacement(): Prevent back navigation
- pushAndRemoveUntil(): Clear stack
- pushNamed(): Use named routes
- PopScope: Control back navigation (replaces the old
WillPopScope)
Data Transfer:
- Send data forward using constructor
- Return data using
pop(context, data)
Back Stack Management:
- Use
pushReplacementafter Login/Register - Clear stack with
pushAndRemoveUntilwhen logging out
Navigator is one of Flutter's most fundamental features. Once you get used to it, it becomes second nature.
Stuck with navigation?
See you in the next article! 🚀
Frequently Asked Questions
What is the difference between push and pushReplacement?
push puts the new page on top of the stack while the old one stays underneath, so the back button works. pushReplacement swaps the top page for the new one, leaving nothing to go back to. Prefer the second one when you leave a login or splash screen.
How do I send data back to the previous page?
Call Navigator.pop(context, data) on the page that closes. On the calling side, Navigator.push(...) returns a Future, so you can await it and read that value. If the user leaves with the back button the result is null, so always handle that case.
Should I use named routes or MaterialPageRoute?
For small and medium apps MaterialPageRoute is enough and it is more type-safe. Flutter's official documentation does not recommend named routes for most apps: their deep-link behavior cannot be customized and the browser's forward button is not supported on the web. If you want a single place that defines navigation or proper deep-link support, a package such as go_router is the better fit.
What should I use instead of WillPopScope?
Use PopScope. canPop: false stops the back gesture, and inside onPopInvokedWithResult you decide and, if appropriate, close the page yourself with Navigator.pop(context). WillPopScope has been deprecated since Flutter 3.16 and does not work with Android's predictive back gesture.
Related Posts
Flutter: BottomNavigationBar vs NavigationBar
Migrating from BottomNavigationBar to Material 3 NavigationBar: property mapping, labelBehavior, a decision guide and an adaptive shell example.
Flutter: Modern State Management with Riverpod 3
State management in Flutter with Riverpod 3: Notifier, AsyncNotifier, ref.watch vs ref.read, family, autoDispose and migration notes for old StateNotifier code.
Flutter: State Management with Provider
State management with Provider package in Flutter, ChangeNotifier, Consumer, MultiProvider usage and best practices.