Flutter Hero Animation and Page Transition Effects
Last updated:
12 min read

Have you ever noticed how, in a shopping app, the small product image you tap grows and settles into place on the detail page? Or how a photo in a gallery opens full screen in one fluid motion? That effect is called a Hero animation.
This post covers how Hero pairs two pages, what controls the duration and curve of the flight, the most common mistakes, and custom page transitions with PageRouteBuilder. If you already know implicit animations, which run on their own when a value changes, Hero is their equivalent for page transitions.
What is Hero Animation?
A Hero animation lets a widget that exists on both pages move smoothly from one page to the other. The widget "flies" from its position on the first page to its position on the second.
It takes its name from mythological heroes: like a hero, the widget travels between two worlds (pages).
Why Use Hero?
When the page changes, users easily lose track of what they tapped and where they landed. Hero keeps that context:
- Visual continuity: The tapped item shows up on the new page as the same item.
- Little code: Wrapping two widgets with the same tag is enough; Flutter generates the animation.
Anatomy of Hero
You need two things for a Hero animation:
- Same tag: Hero widgets on both pages must have the same
tagvalue - Hero widget: Wrap your widget with Hero on both pages
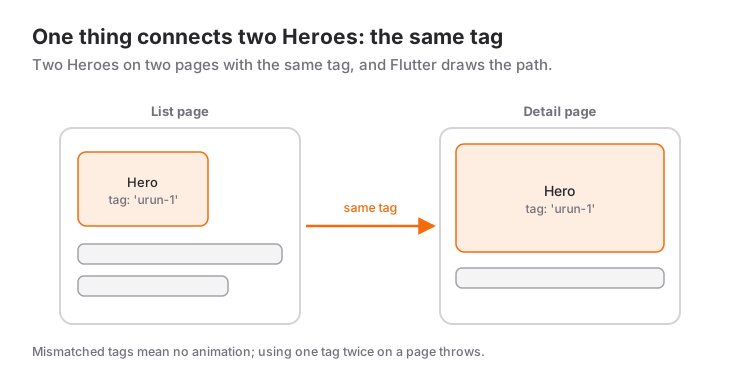
Here's the simplest example:
// First page
Hero(
  tag: 'profile-photo',
  child: CircleAvatar(
    backgroundImage: NetworkImage('https://picsum.photos/200'),
    radius: 30,
  ),
)

// Second page
Hero(
  tag: 'profile-photo', // Same tag!
  child: CircleAvatar(
    backgroundImage: NetworkImage('https://picsum.photos/200'),
    radius: 100, // Different size: Flutter generates the animation in between
  ),
)
When the page transition starts, Flutter pairs the Heroes on both pages by tag and starts a "flight" for every matching pair. The tag can be any object (a String, an int or your own id type), as long as the two sides are equal under ==.
There are two more conditions. First, Hero only works between two PageRoutes: MaterialPageRoute, CupertinoPageRoute and PageRouteBuilder qualify, while the routes opened by showDialog and showModalBottomSheet do not. Second, the children on both sides should look alike. In the words of the Flutter documentation, changes in scale and aspect ratio work well in hero animations, changes in layout or composition do not. A small image turning into a large image is ideal; an image turning into a card is not.
Live Demo
You can try these widgets in the interactive example below:
💡 If the example above doesn't load, click DartPad to run it in a new tab.
Real World Example: Product Card to Detail Page
The most common use case in e-commerce apps:
class ProductCard extends StatelessWidget {
  final String productId;
  final String imageUrl;
  final String name;

  const ProductCard({
    super.key,
    required this.productId,
    required this.imageUrl,
    required this.name,
  });

  @override
  Widget build(BuildContext context) {
    return GestureDetector(
      onTap: () {
        Navigator.push(
          context,
          MaterialPageRoute(
            builder: (context) => ProductDetailPage(
              productId: productId,
              imageUrl: imageUrl,
              name: name,
            ),
          ),
        );
      },
      child: Card(
        child: Column(
          children: [
            Hero(
              tag: 'product-$productId', // Unique tag
              child: Image.network(
                imageUrl,
                height: 150,
                width: double.infinity,
                fit: BoxFit.cover,
              ),
            ),
            Padding(
              padding: const EdgeInsets.all(8),
              child: Text(name, style: const TextStyle(fontWeight: FontWeight.bold)),
            ),
          ],
        ),
      ),
    );
  }
}

class ProductDetailPage extends StatelessWidget {
  final String productId;
  final String imageUrl;
  final String name;

  const ProductDetailPage({
    super.key,
    required this.productId,
    required this.imageUrl,
    required this.name,
  });

  @override
  Widget build(BuildContext context) {
    return Scaffold(
      appBar: AppBar(title: Text(name)),
      body: Column(
        crossAxisAlignment: CrossAxisAlignment.start,
        children: [
          Hero(
            tag: 'product-$productId', // Same tag!
            child: Image.network(
              imageUrl,
              height: 300,
              width: double.infinity,
              fit: BoxFit.cover,
            ),
          ),
          Padding(
            padding: const EdgeInsets.all(16),
            child: Column(
              crossAxisAlignment: CrossAxisAlignment.start,
              children: [
                Text(
                  name,
                  style: const TextStyle(fontSize: 24, fontWeight: FontWeight.bold),
                ),
                const SizedBox(height: 16),
                const Text(
                  'Product description goes here...',
                  style: TextStyle(fontSize: 16),
                ),
              ],
            ),
          ),
        ],
      ),
    );
  }
}
Putting the product id in the tag does two jobs: every card on the list page stays unique, and the detail page knows which card to pair with. Notice that Hero wraps only the image, not the whole card, and that the image comes from the same URL on both pages. The mistakes section below explains why both matter.
Customizing the Hero Flight
1. Duration Comes From the Route, Not From Hero
Hero has no duration parameter of its own. The flight is tied to the route animation that drives the page transition: pushing uses the route's transitionDuration, popping uses its reverseTransitionDuration. In PageRouteBuilder both default to 300 ms:
Navigator.push(
  context,
  PageRouteBuilder(
    transitionDuration: const Duration(milliseconds: 450),
    reverseTransitionDuration: const Duration(milliseconds: 350),
    pageBuilder: (context, animation, secondaryAnimation) => const DetailPage(),
  ),
);
Since no transitionsBuilder is given here, the page appears without any extra effect; the only motion on screen is the Hero flight. With MaterialPageRoute, the duration comes from the platform's page transition style and can change between Flutter versions (the iOS-style transition, for example, takes 500 ms). If you want to set the duration yourself, use PageRouteBuilder or your own PageRoute class.
Which duration should you pick? Flutter's built-in platform page transitions run between 300 and 500 ms, which makes that range a good starting point. Too short and users cannot follow the motion; too long and they wait on every tap. Decide on a real device, replaying the transition a few times.
2. Curve: The Curve in transitionsBuilder Does Not Change the Hero
This is the most common mix-up. The code below gives the page transition Curves.easeOutCubic:
Navigator.push(
  context,
  PageRouteBuilder(
    transitionDuration: const Duration(milliseconds: 500),
    pageBuilder: (context, animation, secondaryAnimation) => const DetailPage(),
    transitionsBuilder: (context, animation, secondaryAnimation, child) {
      final curved = CurvedAnimation(
        parent: animation,
        curve: Curves.easeOutCubic,
      );
      return FadeTransition(opacity: curved, child: child);
    },
  ),
);
That curve only affects the FadeTransition, meaning how the page itself appears. The Hero flight does not go through transitionsBuilder: Flutter paints the flying widget in the overlay above the pages and wraps the route animation in its own curve. That curve is Curves.fastOutSlowIn by default. So in the example above the page fades in with easeOutCubic while the Hero still flies with fastOutSlowIn for 500 ms; the only thing the two animations share is the duration.
Starting with Flutter 3.44, Hero has its own curve and reverseCurve parameters:
Hero(
  tag: 'product-$productId',
  curve: Curves.easeOutCubic, // Flutter 3.44+
  child: Image.network(imageUrl, fit: BoxFit.cover),
)
For the flight, Flutter uses the Hero of the upper page: the page being pushed, or the page being popped. In a list-to-detail flow that is the detail page in both cases, so set these parameters on the detail page's Hero. If reverseCurve is omitted, the way back uses curve.flipped, so the return looks like the forward flight mirrored in time. In earlier versions the flight curve is fixed to fastOutSlowIn; what you can change there is the duration, the flight path and the flying widget.
3. The Flying Widget: flightShuttleBuilder
By default, the destination Hero's child is shown during the flight. When the children on the two sides look different (a small rounded thumbnail on the list, a large square image on the detail page), you can crossfade between them during the flight:
Widget crossFadeShuttle(
  BuildContext flightContext,
  Animation<double> animation,
  HeroFlightDirection direction,
  BuildContext fromContext,
  BuildContext toContext,
) {
  // animation is 0 on the lower page and 1 on the upper page.
  // On push the upper page is "to", on pop it is "from".
  final isPush = direction == HeroFlightDirection.push;
  final topHero = (isPush ? toContext : fromContext).widget as Hero;
  final bottomHero = (isPush ? fromContext : toContext).widget as Hero;

  return Stack(
    fit: StackFit.expand,
    children: [
      FadeTransition(opacity: ReverseAnimation(animation), child: bottomHero.child),
      FadeTransition(opacity: animation, child: topHero.child),
    ],
  );
}

// Give the same builder to the Hero on both pages:
Hero(
  tag: 'product-$productId',
  flightShuttleBuilder: crossFadeShuttle,
  child: ClipRRect(
    borderRadius: BorderRadius.circular(12),
    child: Image.network(imageUrl, fit: BoxFit.cover),
  ),
)
The animation passed to the builder is the route animation with the Hero's curve applied. Because the upper page sits on the toContext side when pushing and on the fromContext side when popping, you have to check direction; if you don't, the crossfade runs backwards on the way back. When both Heroes define a builder, the one on the flight's destination Hero wins, so the safest option is to give the same function to both sides.
4. Flight Path: createRectTween
createRectTween defines the path between the Hero's start and end rectangles. If you use MaterialApp, the default path is already curved: the HeroController that MaterialApp creates uses MaterialRectArcTween. Pass RectTween for a straight line, or MaterialRectCenterArcTween to move the rectangle's center along an arc:
Hero(
  tag: 'avatar-${user.id}',
  createRectTween: (begin, end) => MaterialRectCenterArcTween(begin: begin, end: end),
  child: CircleAvatar(backgroundImage: NetworkImage(user.photoUrl)),
)
Flutter uses the createRectTween of the flight's destination Hero. To make the forward and return flights follow the same path, give the same function to the Hero on both sides.
5. The iOS Back-Swipe Gesture
When a user goes back on iOS by swiping from the edge of the screen, Hero does not fly by default. To turn it on, set transitionOnUserGestures: true on the Heroes on both sides:
Hero(
  tag: 'product-$productId',
  transitionOnUserGestures: true,
  child: Image.network(imageUrl, fit: BoxFit.cover),
)
If the value is true on only one side, the gesture-driven pop has no flight.
6. Turning Hero Off in One Area: HeroMode
Heroes inside a subtree wrapped in HeroMode(enabled: false) don't take part in route changes; the widgets keep showing normally. A handy use is respecting users who have turned animations off in their system settings:
HeroMode(
  enabled: !MediaQuery.disableAnimationsOf(context),
  child: ProductGrid(products: products),
)
Page Transition Animations
Hero may be enough on its own, but you can also decide how the page itself opens with PageRouteBuilder. These effects move the page; the Hero, as explained above, keeps flying on top of them with its own curve. To refresh the basics of Navigator.push, see page navigation with Navigator.
SlideTransition: Sliding Transition
Pages can slide from right to left, left to right, top to bottom:
Navigator.push(
  context,
  PageRouteBuilder(
    pageBuilder: (context, animation, secondaryAnimation) => NextPage(),
    transitionsBuilder: (context, animation, secondaryAnimation, child) {
      const begin = Offset(1.0, 0.0); // Start from right
      const end = Offset.zero; // End at center
      const curve = Curves.easeInOut;

      final tween = Tween(begin: begin, end: end).chain(
        CurveTween(curve: curve),
      );

      final offsetAnimation = animation.drive(tween);

      return SlideTransition(
        position: offsetAnimation,
        child: child,
      );
    },
  ),
);
Direction Examples:
// Right to left
const begin = Offset(1.0, 0.0);

// Left to right
const begin = Offset(-1.0, 0.0);

// Bottom to top
const begin = Offset(0.0, 1.0);

// Top to bottom
const begin = Offset(0.0, -1.0);

// Diagonal (from bottom right)
const begin = Offset(1.0, 1.0);
FadeTransition: Fade Transition
The page goes from transparent to visible in place:
Navigator.push(
  context,
  PageRouteBuilder(
    pageBuilder: (context, animation, secondaryAnimation) => NextPage(),
    transitionsBuilder: (context, animation, secondaryAnimation, child) {
      return FadeTransition(
        opacity: animation,
        child: child,
      );
    },
  ),
);
ScaleTransition: Scale Transition
The page opens from small to large:
Navigator.push(
  context,
  PageRouteBuilder(
    pageBuilder: (context, animation, secondaryAnimation) => NextPage(),
    transitionsBuilder: (context, animation, secondaryAnimation, child) {
      final scaleTween = Tween<double>(begin: 0.0, end: 1.0).chain(
        CurveTween(curve: Curves.elasticOut),
      );

      return ScaleTransition(
        scale: animation.drive(scaleTween),
        child: child,
      );
    },
  ),
);
RotationTransition: Rotation Transition
The page arrives while rotating:
Navigator.push(
  context,
  PageRouteBuilder(
    pageBuilder: (context, animation, secondaryAnimation) => NextPage(),
    transitionsBuilder: (context, animation, secondaryAnimation, child) {
      return RotationTransition(
        turns: animation,
        child: child,
      );
    },
  ),
);
Combining Multiple Animations
You can combine transitions by nesting them:
Navigator.push(
  context,
  PageRouteBuilder(
    pageBuilder: (context, animation, secondaryAnimation) => NextPage(),
    transitionsBuilder: (context, animation, secondaryAnimation, child) {
      // Both fade and slide
      return FadeTransition(
        opacity: animation,
        child: SlideTransition(
          position: Tween<Offset>(
            begin: const Offset(0.0, 0.3),
            end: Offset.zero,
          ).animate(animation),
          child: child,
        ),
      );
    },
  ),
);
Custom Transition: "Zoom Fade Slide"
A reusable transition widget that combines zoom, fade and slide:
class ZoomFadeSlideTransition extends StatelessWidget {
  final Animation<double> animation;
  final Widget child;

  const ZoomFadeSlideTransition({
    super.key,
    required this.animation,
    required this.child,
  });

  @override
  Widget build(BuildContext context) {
    final curved = CurvedAnimation(parent: animation, curve: Curves.easeOut);
    return FadeTransition(
      opacity: animation,
      child: SlideTransition(
        position: Tween<Offset>(
          begin: const Offset(0, 0.1),
          end: Offset.zero,
        ).animate(curved),
        child: ScaleTransition(
          scale: Tween<double>(begin: 0.9, end: 1.0).animate(curved),
          child: child,
        ),
      ),
    );
  }
}

// Usage:
Navigator.push(
  context,
  PageRouteBuilder(
    pageBuilder: (context, animation, secondaryAnimation) => NextPage(),
    transitionsBuilder: (context, animation, secondaryAnimation, child) {
      return ZoomFadeSlideTransition(
        animation: animation,
        child: child,
      );
    },
  ),
);
Animation Character with Curves
A curve defines how an animation speeds up and slows down. You can apply these curves to the page transition with CurveTween or CurvedAnimation, and to the flight with Hero.curve on Flutter 3.44 and later:
// Linear: feels mechanical
Curves.linear

// Starts slow, speeds up, ends slow
Curves.easeInOut

// Starts slow
Curves.easeIn

// Ends slow
Curves.easeOut

// Starts fast, slows down near the target; the Hero flight default
Curves.fastOutSlowIn

// Starts fast and decelerates to a stop
Curves.decelerate

// Overshoots the target slightly and comes back
Curves.easeOutBack

// Elastic: playful feel
Curves.elasticOut

// Bounces to a stop: eye-catching
Curves.bounceOut
Tip: Calm curves such as Curves.easeInOut, Curves.easeOut or Curves.fastOutSlowIn work well for UI transitions. Extreme curves like Curves.bounceOut grab attention but get tiring when they repeat on every transition.
Performance Tips
1. Use FadeTransition Instead of Opacity for Animated Opacity
// ❌ Bad: the controller triggers setState every frame and the subtree rebuilds
Opacity(
  opacity: _controller.value,
  child: HeavyWidget(),
)

// ✅ Good: FadeTransition only updates the opacity; the child is not rebuilt
FadeTransition(
  opacity: _controller,
  child: const HeavyWidget(),
)
For opacity that toggles on a boolean, AnimatedOpacity does the same job.
2. Use the child Passed to transitionsBuilder
pageBuilder builds the page once, while transitionsBuilder can be called again whenever the route's state changes. Instead of rebuilding heavy content inside the builder, always wrap the child you receive:
Navigator.push(
  context,
  PageRouteBuilder(
    pageBuilder: (context, animation, secondaryAnimation) => NextPage(),
    transitionsBuilder: (context, animation, secondaryAnimation, child) {
      return FadeTransition(
        opacity: animation,
        child: child, // the page built by pageBuilder
      );
    },
  ),
);
Real World Use Cases
1. Photo Gallery
GridView.builder(
  itemCount: photos.length,
  gridDelegate: const SliverGridDelegateWithFixedCrossAxisCount(
    crossAxisCount: 3,
    crossAxisSpacing: 4,
    mainAxisSpacing: 4,
  ),
  itemBuilder: (context, index) {
    return GestureDetector(
      onTap: () {
        Navigator.push(
          context,
          MaterialPageRoute(
            builder: (context) => PhotoViewPage(
              photoUrl: photos[index],
              tag: 'photo-$index',
            ),
          ),
        );
      },
      child: Hero(
        tag: 'photo-$index',
        child: Image.network(
          photos[index],
          fit: BoxFit.cover,
        ),
      ),
    );
  },
)
2. Profile Photo Expansion
// List item
ListTile(
  leading: GestureDetector(
    onTap: () => Navigator.push(
      context,
      MaterialPageRoute(
        builder: (context) => ProfilePage(user: user),
      ),
    ),
    child: Hero(
      tag: 'avatar-${user.id}',
      child: CircleAvatar(
        backgroundImage: NetworkImage(user.photoUrl),
      ),
    ),
  ),
  title: Text(user.name),
)

// Profile page
Scaffold(
  body: Column(
    children: [
      Hero(
        tag: 'avatar-${user.id}',
        child: CircleAvatar(
          backgroundImage: NetworkImage(user.photoUrl),
          radius: 80,
        ),
      ),
      // Other info...
    ],
  ),
)
Common Mistakes and Solutions
Mistake 1: The Same Tag Twice on One Page
Symptom: The error There are multiple heroes that share the same tag within a subtree. during the transition. A tag must be unique within a route; having the same tag on two different pages is exactly what makes them pair. It shows up most often in lists:
// ❌ Wrong
ListView.builder(
  itemBuilder: (context, index) {
    return Hero(
      tag: 'item', // All have the same tag!
      child: ListTile(title: Text('Item $index')),
    );
  },
)
Solution: Give every item a unique tag.
// ✅ Correct
ListView.builder(
  itemBuilder: (context, index) {
    return Hero(
      tag: 'item-$index', // Each item is unique
      child: ListTile(title: Text('Item $index')),
    );
  },
)
If the same product appears twice on a page (in both a "Featured" and an "All products" section, say), the id alone is not enough. Add the section to the tag and pass the tag the detail page was opened with as a parameter:
// List
Hero(tag: 'featured-${product.id}', child: ProductImage(product))

// When opening the detail page
ProductDetailPage(product: product, heroTag: 'featured-${product.id}')
Mistake 2: Several FloatingActionButtons on One Page
FloatingActionButton already wraps itself in a Hero, and without a heroTag every FAB shares the same default tag. Two FABs on the same page give you the previous error. Give each one a different heroTag, or set heroTag: null if it doesn't need to fly:
FloatingActionButton(
  heroTag: 'add-note', // To disable the flight: heroTag: null
  onPressed: () {},
  child: const Icon(Icons.add),
)
Mistake 3: A Hero Inside a Hero
Symptom: A Hero widget cannot be the descendant of another Hero widget. A Hero's child cannot contain another Hero. Since a FAB is itself a Hero, wrapping the FAB's icon in its own Hero triggers this error too. If you want two items to fly separately, place them as siblings instead of nesting them.
Mistake 4: Yellow Double Underline Under Text During the Flight
If the Hero's child contains text, you may see large red text with a yellow double underline during the flight. The flying widget is not painted inside the page's Scaffold and Material but in the Navigator's overlay; there the text can't find the theme style and falls back to MaterialApp's "missing Material" warning style. The fix is to wrap the child in a transparent Material and give the text an explicit style:
Hero(
  tag: 'title-$productId',
  child: Material(
    type: MaterialType.transparency,
    child: Text(
      name,
      style: Theme.of(context).textTheme.titleLarge,
    ),
  ),
)
Use the same wrapper in the Hero on both sides.
Mistake 5: Overflow During the Flight
The flying widget is laid out again at every intermediate size between the start and end size. If the child is a fixed layout such as a Column or Row, it may not fit one of those sizes and report RenderFlex overflowed. Put the Hero on the part that scales (usually the image) rather than on the whole card, and show the rest of the card normally on the detail page. If the flight really needs a different look, supply a simpler widget with flightShuttleBuilder.
Mistake 6: An Empty Box During the Flight
By default, the destination page's child is shown during the flight. If the detail page loads a larger version of the image from a different URL, that image hasn't loaded yet and you see an empty box in flight. When both pages use the same URL, Image.network reads from Flutter's image cache and the image already loaded on the list page is ready for the flight. If you need the larger version, fly with the small image (for example by showing the source Hero's child in a flightShuttleBuilder) and load the large image on the detail page afterward.
Bonus: Reusable Transition Helper
A helper class you can use throughout your project:
enum PageTransitionType { fade, slide, scale, rotation }

class PageTransitionHelper {
  static Route<T> createRoute<T>(
    Widget page, {
    PageTransitionType type = PageTransitionType.fade,
    Duration duration = const Duration(milliseconds: 300),
  }) {
    return PageRouteBuilder<T>(
      transitionDuration: duration,
      reverseTransitionDuration: duration,
      pageBuilder: (context, animation, secondaryAnimation) => page,
      transitionsBuilder: (context, animation, secondaryAnimation, child) {
        return switch (type) {
          PageTransitionType.fade => FadeTransition(opacity: animation, child: child),
          PageTransitionType.slide => SlideTransition(
              position: Tween<Offset>(
                begin: const Offset(1.0, 0.0),
                end: Offset.zero,
              ).animate(animation),
              child: child,
            ),
          PageTransitionType.scale => ScaleTransition(
              scale: CurvedAnimation(parent: animation, curve: Curves.easeOut),
              child: child,
            ),
          PageTransitionType.rotation => RotationTransition(turns: animation, child: child),
        };
      },
    );
  }
}

// Usage:
Navigator.push(
  context,
  PageTransitionHelper.createRoute(
    NextPage(),
    type: PageTransitionType.slide,
  ),
);
Because the switch expression over the enum covers every case, no default branch is needed; when you add a new transition type, the compiler points out the missing branch.
Summary
- Hero: Widgets with the same
tag"fly" between twoPageRoutes; a tag must be unique within a page. - Duration: Comes from the route (
transitionDuration,reverseTransitionDuration). - Curve: The curve in
transitionsBuilderonly affects the page; the flight's default curve isfastOutSlowInand can be changed withHero.curveon Flutter 3.44+. flightShuttleBuilderchanges the flying widget andcreateRectTweenthe flight path; give both to the Hero on both sides.transitionOnUserGesturescovers the iOS back swipe,HeroModeturns off an area.SlideTransition,FadeTransition,ScaleTransition,RotationTransitionandPageRouteBuildercustomize the page transition separately.- Performance:
FadeTransitionfor animated opacity, and thechildpassed totransitionsBuilder.
Frequently Asked Questions
Why does my Hero animation do nothing?
There are three common causes: the tag values on the two pages are not equal under ==, one of the Heroes sits under HeroMode(enabled: false), or the new page is not a PageRoute. showDialog and showModalBottomSheet don't use a PageRoute, so Hero doesn't fly. If you want a Hero on a dialog-style page, open your own route with PageRouteBuilder(opaque: false, barrierColor: Colors.black54, ...).
How do I change the duration of a Hero transition?
The duration comes from the route, not from Hero itself. Use PageRouteBuilder and set transitionDuration for opening and reverseTransitionDuration for closing.
Why doesn't the curve I pass to transitionsBuilder change the Hero?
That curve only applies to the widgets that draw the page transition. The Hero flight uses the route animation with its own curve (Curves.fastOutSlowIn by default). On Flutter 3.44 and later you can change it by passing curve: to the Hero on the detail page.
Can I put a Hero on every item of a ListView?
Yes, as long as each item gets a unique tag; a product id works well. If the same tag appears on more than one Hero on the same page, the transition throws an error.
When should I not use Hero?
Hero makes sense when the item on both pages represents the same thing. If the detail page doesn't show that item, or it means something else there (an icon in the list turning into a button on the detail page, for example), the flight misleads the user; a normal page transition is enough.
Related Posts
Flutter: Zero Effort, Maximum Impact with Implicit Animations
Add smooth animations with very little code using AnimatedContainer, AnimatedOpacity, AnimatedPositioned and other implicit animation widgets.
Flutter Explicit Animations: AnimationController Guide
Create professional animations in Flutter with AnimationController, Tween, and AnimatedBuilder. Learn all the details of explicit animations.
Flutter: Light and Dark Themes with ThemeData
Building a Flutter theme with ThemeData: ColorScheme.fromSeed, light and dark themes, ThemeMode, reading with Theme.of, TextTheme, component themes, extensions.