
Making Video with AI: The Complete Guide from Idea to Publish
8 min read
Making video with AI is no longer "open a tool, type a sentence". Getting a usable video out follows the same order as shooting one: you decide what you are saying, you break it into shots, you capture them — and only then do you edit.
This guide walks that entire order. It is not a tool tour; it is the workflow from idea to publish. Which tool helps at which step, where you burn money, and what still has to be done by hand.
Wherever you want to go deeper, I link to a detailed article.
Why you start with the workflow, not the tool
Almost every beginner makes the same mistake: open a tool, type a sentence, dislike the result, try another tool. After six tools the conclusion becomes "this does not work".
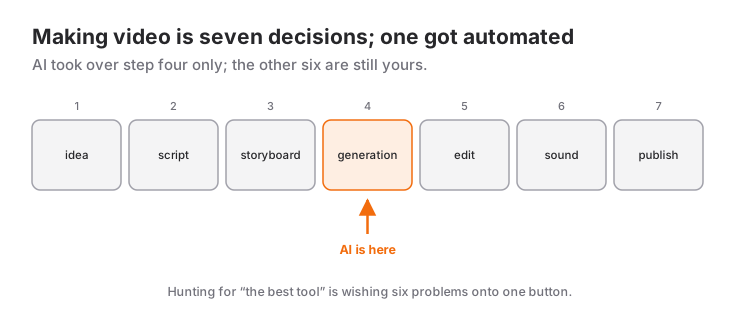
But the problem is not the tool. Making a video is not one action, it is seven separate decisions. The tool handles exactly one of them:
- What you are saying (the idea)
- In what order (the script)
- How many shots, how long each (the storyboard)
- How each shot's image comes into being (generation)
- How the shots join (the edit)
- Where the sound comes from (music, effects, narration)
- Where it gets published (format, thumbnail, title)
AI took over number four. The other six are still yours. The hunt for "the best tool" is really the wish to dump six problems onto one button, which is why it always ends in disappointment.
1. The idea: one sentence
Every video needs a one-sentence core. Not "a video introducing this product" but "a video that makes you feel the problem this product solves within three seconds".
Without that sentence you get lost in generation: every shot looks nice and the video says nothing. AI amplified this, because "a nice shot" is now free. What is scarce is not imagery, it is direction.
A practical check: can someone who just watched it tell you in one sentence what it said? If not, the problem is here, not in the edit.
2. The script: the three-second rule
On short-video platforms the first three seconds decide everything. So instead of a classic beginning-middle-end I build scripts like this:
- 0–3s: show the result or the problem. Curiosity or recognition.
- 3–15s: show how. The densest information sits here.
- 15–25s: show the result again, now with meaning.
- end: exactly one call to action. Two calls means none.
Keep sentences short. Long sentences blur shot boundaries and break the rhythm in the edit.
3. The storyboard: most skipped, most profitable
A storyboard is pen and paper and takes ten minutes. Skipping it burns half your budget.
For every shot write three things: duration, what is visible, what the camera does. For example:
Shot 1 · 3s · cluttered notebooks on a desk · slow push in
Shot 2 · 2s · app opening on a phone · static, over the shoulder
Shot 3 · 4s · streak counter rising on screen · gentle drift
The moment you write this you know how many generations you need — which means you know your cost. Without it you decide during generation, and every undecided attempt is money.
One rule to keep: one event per shot. "Walks, sits, gets up and leaves" is three shots. Ask for it in one generation and all three come out badly.
4. Generation: which tool for which job
This is the step AI took over, and it splits three ways depending on what you already have.
You have nothing — text to video. It generates the shot you describe from scratch. The most flexible and least controllable route. The prompt has to carry five parts: subject, action, place, camera, light. Detail in the introduction to Higgsfield.
You have footage — video to video. Do not try to re-capture the camera and timing; you already have them. Higgsfield's Genjutsu preserves the motion and changes the character, wardrobe, location or product in frame. It is the cheapest way to produce ad variants. That article also covers blocking a rough scene in Blender and running it through to get an action shot.
You are building a scene — scene-first tools. Google Flow is built around connecting shots and picking camera moves from a list. I put them side by side in the Flow versus Higgsfield comparison.
You are embedding it in a product — APIs and connectors. Calling generation from inside your own app is its own world; I covered it end to end in the Higgsfield + Fable 5.1 article.
5. Cost: the one number that sets the bill
The most important sentence in this guide: the bill is set by attempts, not resolution.
Across every tool the cost comes out of this product:
cost = attempts × resolution × durationFour to six attempts for a usable ten-second shot is normal. So the critical decision is what quality those attempts run at:
- Run every attempt at the lowest resolution. Composition, timing and motion are all visible there.
- Lock the prompt and references you liked.
- Run only the final at high resolution.
That order routinely cuts the cost to a third. Doing the opposite — starting high and iterating six times — is the most expensive way to learn.
6. Consistency: same character, different shots
The best-known weakness of generative video: the same character will not come back identical in two generations. The fix is not describing it better but showing it:
- Supply the character as front, profile and full-body references.
- Add close-ups of the key details (logo, accessory, texture).
- Use the same reference set and the same prompt template across every shot.
Tools offer different features for this — up to 40 reference images on the Higgsfield side, predefined character/object/style references on the Flow side. The logic is identical: you want the model reading, not imagining.
7. Edit, sound and publishing
Generated shots are not a video on their own. What remains is still classic craft:
The edit. Ordering shots, cutting the excess. The cut point is usually "the moment the action ends" — half a second earlier than you think.
Sound. The hidden half. Viewers forgive bad picture and do not forgive bad audio. Room tone, impacts and music level move the needle more than the shots do.
On-screen text. Signage, screens and labels still break in generative models. Rather than generating text, composite it in the edit — it comes out clean and you can swap the language.
Captions. Most short-video viewers watch muted. Publishing without captions throws away half the video.
Thumbnail and title. A video nobody clicks has no measurable quality. Design the thumbnail independently of the video; the best frame is not the best thumbnail.
What is still hard today
Honest limits to plan around:
- No long takes. Models work in seconds. A one-minute piece comes out of editing short shots.
- Hands and fast motion are the risk zone. Keep those shots short.
- Text in frame breaks.
- Physical consistency (an object staying the same across a shot) is not guaranteed.
None of this means unusable; it means plan around it. Do not put the hard thing at the centre of your video.
Rights, transparency and real people
Three rules:
- Read the commercial terms of the tool you use; they change often and in client work the responsibility is yours.
- Do not generate a real person's face or voice without permission.
- Do not hide that you used AI. Explaining how you made it usually draws more interest than the piece itself.
Where to start
Finish one job end to end over a weekend:
- Pick a real need — a 15-second teaser is enough.
- Write the one-sentence core.
- Put the storyboard on paper.
- Generate every shot at low resolution, re-run the keepers at high resolution.
- Edit, add sound and captions, publish.
Do those five once and you will not have to relearn when the tools change. Tools change every six months; this order does not.
Tool names, versions and prices move fast; verify on the vendor's current page before deciding.
Frequently Asked Questions
How do you make a video with AI?
The order is: write the one-sentence core, build the script so the first three seconds show the result, define each shot's duration and camera in a storyboard, generate the shots at low resolution and re-run only the keepers at high resolution, then finish with the edit, sound, captions and thumbnail. AI takes over only the generation step of those seven.
Is AI video generation free?
Most tools include a limited free allowance, and serious use runs on credits or a subscription. What sets the cost is not the price list but the number of attempts: running every attempt at low resolution and only the final at high quality can cut the bill to a third.
Which AI video tool is best?
There is no single best; it depends on the job. Text-to-video models lead for generating shots from scratch, video-to-video (such as Genjutsu) for changing footage you already have, and scene-first tools like Google Flow for joining shots into a scene. Professional workflows usually use more than one.
How long can an AI-generated video be?
A single generation spans a few seconds up to around half a minute. Longer videos come from editing short shots together rather than from one generation, which is why the storyboard matters more than the tool.
How do I keep the same character across shots?
Show the character with reference images instead of describing it: front, profile, full body and close-ups of key details. Use the same reference set and prompt template in every shot. Tools offer different features for this, but the logic is the same — make the model read rather than imagine.
Can I use AI-generated video commercially?
Most tools allow publishing subject to their own terms of use, but those terms change often and in client work the responsibility is yours. Separately, generating a real person's face or voice without permission is something to avoid regardless of what the terms allow.
Related Posts
What Is Higgsfield? A Practical Start to Making Video with AI
Which models Higgsfield hosts, how credits really work, how to produce your first shot, and which tool to reach for on which job.
Google Flow or Higgsfield? Comparing the AI Video Tools
Flow's scene building against Higgsfield's model range: how credits work, what each is genuinely good at, and when to pick which.
Higgsfield Genjutsu: Rewriting Footage You Already Shot (with Blender)
Genjutsu keeps the motion and rebuilds the scene. Here are its two modes, its real limits, and how to turn a rough Blender block-out into an action shot.