Flutter: Creating Our Own Widgets
Last updated:
7 min read

In Flutter we build screens by nesting ready-made widgets, and sooner or later we catch ourselves typing the same Card + Padding + Column structure for the third time. That is exactly where a custom widget comes in: you give the repeated piece of UI a name and turn the parts that vary into constructor parameters. The result is shorter build methods, changes made in one place and, when done right, fewer rebuilds.
Live Demo: Creating Custom Widgets
Learn how to create your own widgets interactively:
💡 If the example above doesn't load, click DartPad to run it in a new tab.
Basic Structure with StatelessWidget
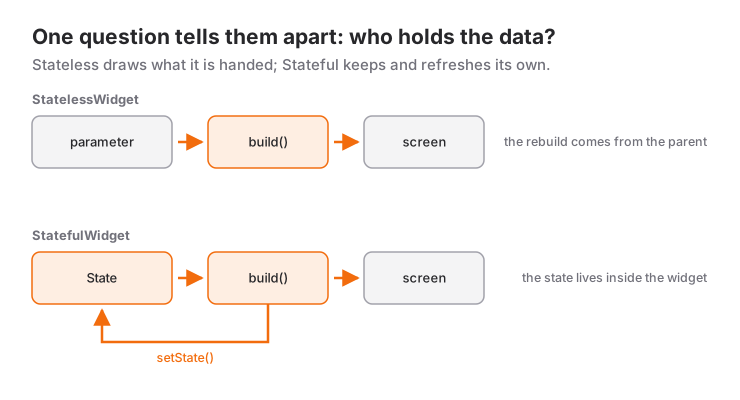
For widgets that hold no changing data of their own and simply display the parameters they receive, we use StatelessWidget:
class MyCustomWidget extends StatelessWidget {
  const MyCustomWidget({super.key});

  @override
  Widget build(BuildContext context) {
    return const Padding(
      padding: EdgeInsets.all(16),
      child: Text('My Custom Widget'),
    );
  }
}
Two details repeat in every custom widget. super.key is the short way of forwarding the key parameter to the superclass; it does the same job as the {Key? key}) : super(key: key) spelling you will see in older examples. The const in front of the constructor lets us create the widget as const MyCustomWidget(). Flutter knows a const widget hasn't changed, so it can skip it when the parent rebuilds.
Parameters with Constructor
Parameters are what make a widget customizable. Fields are always final; values arrive through the constructor:
class CustomButton extends StatelessWidget {
  const CustomButton({
    super.key,
    required this.text,
    required this.onPressed,
    this.icon,
  });

  final String text;
  final VoidCallback onPressed;
  final IconData? icon;

  @override
  Widget build(BuildContext context) {
    return FilledButton(
      onPressed: onPressed,
      child: Row(
        mainAxisSize: MainAxisSize.min,
        children: [
          if (icon != null) ...[
            Icon(icon, size: 18),
            const SizedBox(width: 8),
          ],
          Text(text),
        ],
      ),
    );
  }
}
Usage:
CustomButton(
  text: 'Save',
  icon: Icons.save,
  onPressed: () {
    print('Saved');
  },
)
The widget doesn't know what the user is doing; it only reports outward through onPressed. The screen above it makes the decision. This "data down, events up" flow is the basic rule of custom widget design.
Required, Optional and Default-Valued Parameters
class CustomCard extends StatelessWidget {
  const CustomCard({
    super.key,
    required this.title,         // Required
    this.subtitle,               // Optional (nullable)
    this.padding = 16,           // Has a default value
  });

  final String title;
  final String? subtitle;
  final double padding;

  @override
  Widget build(BuildContext context) {
    final textTheme = Theme.of(context).textTheme;

    return Card(
      child: Padding(
        padding: EdgeInsets.all(padding),
        child: Column(
          crossAxisAlignment: CrossAxisAlignment.start,
          children: [
            Text(title, style: textTheme.titleMedium),
            if (subtitle != null) // Show if present
              Text(subtitle!, style: textTheme.bodySmall),
          ],
        ),
      ),
    );
  }
}
const CustomCard(title: 'Title') // no subtitle
const CustomCard(
title: 'Title',
subtitle: 'Subtitle',
padding: 24,
)The rule for choosing is simple: required if the widget makes no sense without the value, nullable if it can work without it, and a default value if most call sites would pass the same thing. Details about the card itself are in the Card post.
Flexible Widgets with a child Parameter
Rather than adding a parameter for every possibility, taking the content from outside is often the better design. Flutter's own widgets work the same way:
class SectionBox extends StatelessWidget {
  const SectionBox({
    super.key,
    required this.child,
    this.borderRadius = 12,
  });

  final Widget child;
  final double borderRadius;

  @override
  Widget build(BuildContext context) {
    final colors = Theme.of(context).colorScheme;

    return Container(
      padding: const EdgeInsets.all(16),
      decoration: BoxDecoration(
        color: colors.surfaceContainerHighest,
        borderRadius: BorderRadius.circular(borderRadius),
      ),
      child: child,
    );
  }
}
const SectionBox(child: Text('Content'))
SectionBox(
child: Column(
children: const [Text('Title'), Text('Subtitle')],
),
)Widget Class or Helper Method?
There are two ways to break up a long build method: write private methods like _buildHeader() that return a Widget, or extract the piece into its own widget class. The first needs less code, but the two are not the same thing:
// Helper method: runs again every time the parent widget builds
Widget _buildHeader() {
  return Row(
    children: [
      CircleAvatar(child: Text(author[0])),
      const SizedBox(width: 8),
      Text(author),
    ],
  );
}

// Separate widget: can be const, has its own BuildContext
class _PostHeader extends StatelessWidget {
  const _PostHeader({required this.author});

  final String author;

  @override
  Widget build(BuildContext context) {
    return Row(
      children: [
        CircleAvatar(child: Text(author[0])),
        const SizedBox(width: 8),
        Text(author),
      ],
    );
  }
}
To Flutter, a helper method is not a separate widget; its output is glued straight into the parent's build result. Whenever setState is called in the parent, the method runs again too. A separate class can be created as const and can be exempted from rebuilding as long as its parameters don't change, which makes a difference on frequently updated screens. It also has its own BuildContext, shows up under its own name in the widget tree and can be tested on its own.
A practical rule: if the piece is a few lines long and only meaningful inside that one build, a method is fine. If it grows, will be used elsewhere, or the parent rebuilds often, extract a class. The leading underscore (_PostHeader) makes the class private to the file; not every piece has to be exposed to the whole project. To refresh how the tree is put together, see the widget tree post.
Custom Widget with StatefulWidget
When a widget has to hold a value that changes inside it, use StatefulWidget. A quantity selector is a good example:
class QuantitySelector extends StatefulWidget {
  const QuantitySelector({
    super.key,
    this.initialValue = 1,
    required this.onChanged,
  });

  final int initialValue;
  final ValueChanged<int> onChanged;

  @override
  State<QuantitySelector> createState() => _QuantitySelectorState();
}

class _QuantitySelectorState extends State<QuantitySelector> {
  late int _quantity = widget.initialValue;

  void _update(int value) {
    if (value < 1) return;
    setState(() => _quantity = value);
    widget.onChanged(value);
  }

  @override
  Widget build(BuildContext context) {
    return Row(
      mainAxisSize: MainAxisSize.min,
      children: [
        IconButton(
          icon: const Icon(Icons.remove),
          onPressed: () => _update(_quantity - 1),
        ),
        Text('$_quantity', style: Theme.of(context).textTheme.titleLarge),
        IconButton(
          icon: const Icon(Icons.add),
          onPressed: () => _update(_quantity + 1),
        ),
      ],
    );
  }
}
The widget keeps the number itself but reports every change outward through onChanged; calculating the cart total is the parent screen's job. initState, dispose and the other steps are covered in detail in the life cycle post.
When to Use It and When Not To
If you see one of these signs, it is time to extract a piece into its own widget:
- The same structure is being written for the second or third time.
- The
buildmethod no longer fits on one screen and the indentation has become unreadable. - A small part of the screen updates often and
setStaterebuilds the entire page.
In these cases a separate widget is unnecessary or the wrong tool:
- Only the style changes: instead of writing a
MyButtonwrapper so all buttons share a color, configure the button themes inThemeData. A theme is managed in one place and affects every built-in widget. - A one-off, three-line fragment: turning every
Padding + Textpair into a class scatters code across files and makes it harder to read. - The parameter count is getting out of hand: a widget with ten
boolflags really wants to be two or three separate widgets. Parameters that accept widgets, such aschildorleading/trailing, are more flexible than flags.
Common Mistakes
1. A non-final field in a StatelessWidget
Symptom: the analyzer warns "This class (or a class that this class inherits from) is marked as '@immutable', but one or more of its instance fields aren't final"; even if you change the field, the screen doesn't update.
// Wrong
class PriceTag extends StatelessWidget {
  PriceTag({super.key, required this.price});
  double price; // not final
  // ...
}
Widgets are immutable objects. If the value changes from outside, the parent rebuilds with the new value; if it changes inside the widget, you need a StatefulWidget with a field in its State.
2. Not writing a const constructor
Symptom: writing const MyWidget() gives "The constructor being called isn't a const constructor". To add const to a constructor, all fields just have to be final. The code works without const, but you lose the chance for Flutter to skip that widget during rebuilds. Following the analyzer's prefer_const_constructors hints builds the habit on its own.
3. Calling the callback instead of passing it
// Wrong: the function runs immediately during build
CustomButton(text: 'Delete', onPressed: _delete())

// Right: the function itself is passed
CustomButton(text: 'Delete', onPressed: _delete)
Symptom: the action runs as soon as the screen opens, before the button is pressed. If it contains a setState, you get "setState() or markNeedsBuild() called during build". Parentheses call the function; write it without them or use () => _delete().
4. Copying a parameter into State and forgetting to update it
Symptom: the parent sends a new value but the old one stays on screen. Because initState runs only once, a value copied there never sees later changes. If the value is only displayed, read widget.value directly without copying; if it really has to be copied, update it in didUpdateWidget:
@override
void didUpdateWidget(covariant QuantitySelector oldWidget) {
  super.didUpdateWidget(oldWidget);
  if (oldWidget.initialValue != widget.initialValue) {
    _quantity = widget.initialValue;
  }
}
Mini Scenario: An Empty State Widget
Almost every app needs a "nothing here yet" view in more than one place: empty cart, empty favorites, a search without results. They all share one skeleton: icon, title, description and an optional button.
class EmptyState extends StatelessWidget {
  const EmptyState({
    super.key,
    required this.icon,
    required this.title,
    required this.message,
    this.actionLabel,
    this.onAction,
  });

  final IconData icon;
  final String title;
  final String message;
  final String? actionLabel;
  final VoidCallback? onAction;

  @override
  Widget build(BuildContext context) {
    final theme = Theme.of(context);

    return Center(
      child: Padding(
        padding: const EdgeInsets.all(24),
        child: Column(
          mainAxisSize: MainAxisSize.min,
          children: [
            Icon(icon, size: 64, color: theme.colorScheme.outline),
            const SizedBox(height: 16),
            Text(title, style: theme.textTheme.titleLarge),
            const SizedBox(height: 8),
            Text(
              message,
              textAlign: TextAlign.center,
              style: theme.textTheme.bodyMedium,
            ),
            if (actionLabel != null && onAction != null) ...[
              const SizedBox(height: 24),
              FilledButton(onPressed: onAction, child: Text(actionLabel!)),
            ],
          ],
        ),
      ),
    );
  }
}
On the cart screen, using it comes down to a single condition:
body: items.isEmpty
    ? EmptyState(
        icon: Icons.shopping_cart_outlined,
        title: 'Your cart is empty',
        message: 'Products you add to the cart will show up here.',
        actionLabel: 'Start Shopping',
        onAction: () => Navigator.pop(context),
      )
    : CartList(items: items),
Because colors and text styles come from the theme instead of being hard-coded, the widget looks right in light and dark themes with no extra work. The button appears when both parameters are given; for a purely informational empty state, simply leave both out.
Frequently Asked Questions
Should I use StatelessWidget or StatefulWidget?
If the widget only displays values it receives from outside, StatelessWidget is enough. If it holds a value that changes over time, a controller or an animation, it needs StatefulWidget. When in doubt, start with StatelessWidget and convert when the need arises.
What is super.key, and do I have to write it?
super.key is the short syntax that forwards the widget's key parameter to the superclass. It isn't mandatory, but a key is needed when widgets are reordered in lists or their state must be preserved, so including it in every custom widget is standard practice.
What does a const constructor do?
A widget created with const is produced as a single instance at compile time, and Flutter knows it hasn't changed. When the parent rebuilds, that subtree can be skipped, which reduces unnecessary work especially on frequently updated screens.
Helper method or separate widget class: which is better?
For small pieces that only make sense inside a single build, a helper method is enough. When the piece grows, will be reused, or the parent rebuilds often, a separate widget class is the better choice because it can be const and has its own BuildContext.
Related Posts
Flutter: ListView Widget Usage
A practical Flutter ListView guide: lazy lists with builder, separated, itemExtent, the real cost of shrinkWrap and fixing the unbounded height error.
Flutter: GridView Widget Usage
A practical Flutter GridView guide: count, extent and builder, the two grid delegates, the childAspectRatio overflow error and the real cost of shrinkWrap.
Flutter: Asynchronous Listing with FutureBuilder
Flutter FutureBuilder: reading snapshot states in the right order, the Future-in-build mistake, the initState fix and refreshing with setState.